Since the web spread developers, business owners, and individuals use different types of platforms for their websites and some of them are very complex and run scheduled jobs in the background at different time intervals. This can be a processing of data, cleaning of data, sequential ordering, and processing of other jobs as well. This can also be run per minute, per hour, per day, or even once a year.
In this guide, We will be demonstrating configuring Cron Jobs for the WordPress website which is the top platform used by Website Owners on the web.
By default, WordPress runs all the scheduled events with PHP and the cron script for WordPress is the wp-cron.php file under the root directory of WordPress. The issue is when no execution is occurring on the website either on the frontend and or especially on the backend, WordPress scheduled events tend to fail or miss the time! That is the important reason to consider disabling cron execution from PHP and to ensure the execution and processing of scheduled events server-side cron job is the best way among all the possibilities.
Table of Contents
Open Table of Contents
Disable default PHP-based Scheduled Job
The initial step is to disable the default method as the PHP-based job and then we execute or invoke the wp-cron.php from the cron job. To do this please open the wp-config.php file and look for the section below:
/* Add any custom values between this line and the "stop editing" line. */


/* That's all, stop editing! Happy publishing. */
We need to add a new Configuration Directive within these two lines which are below:
define('DISABLE_WP_CRON', true);Now the code will look similar as below:
/* Add any custom values between this line and the "stop editing" line. */

define('DISABLE_WP_CRON', true);
/* That's all, stop editing! Happy publishing. */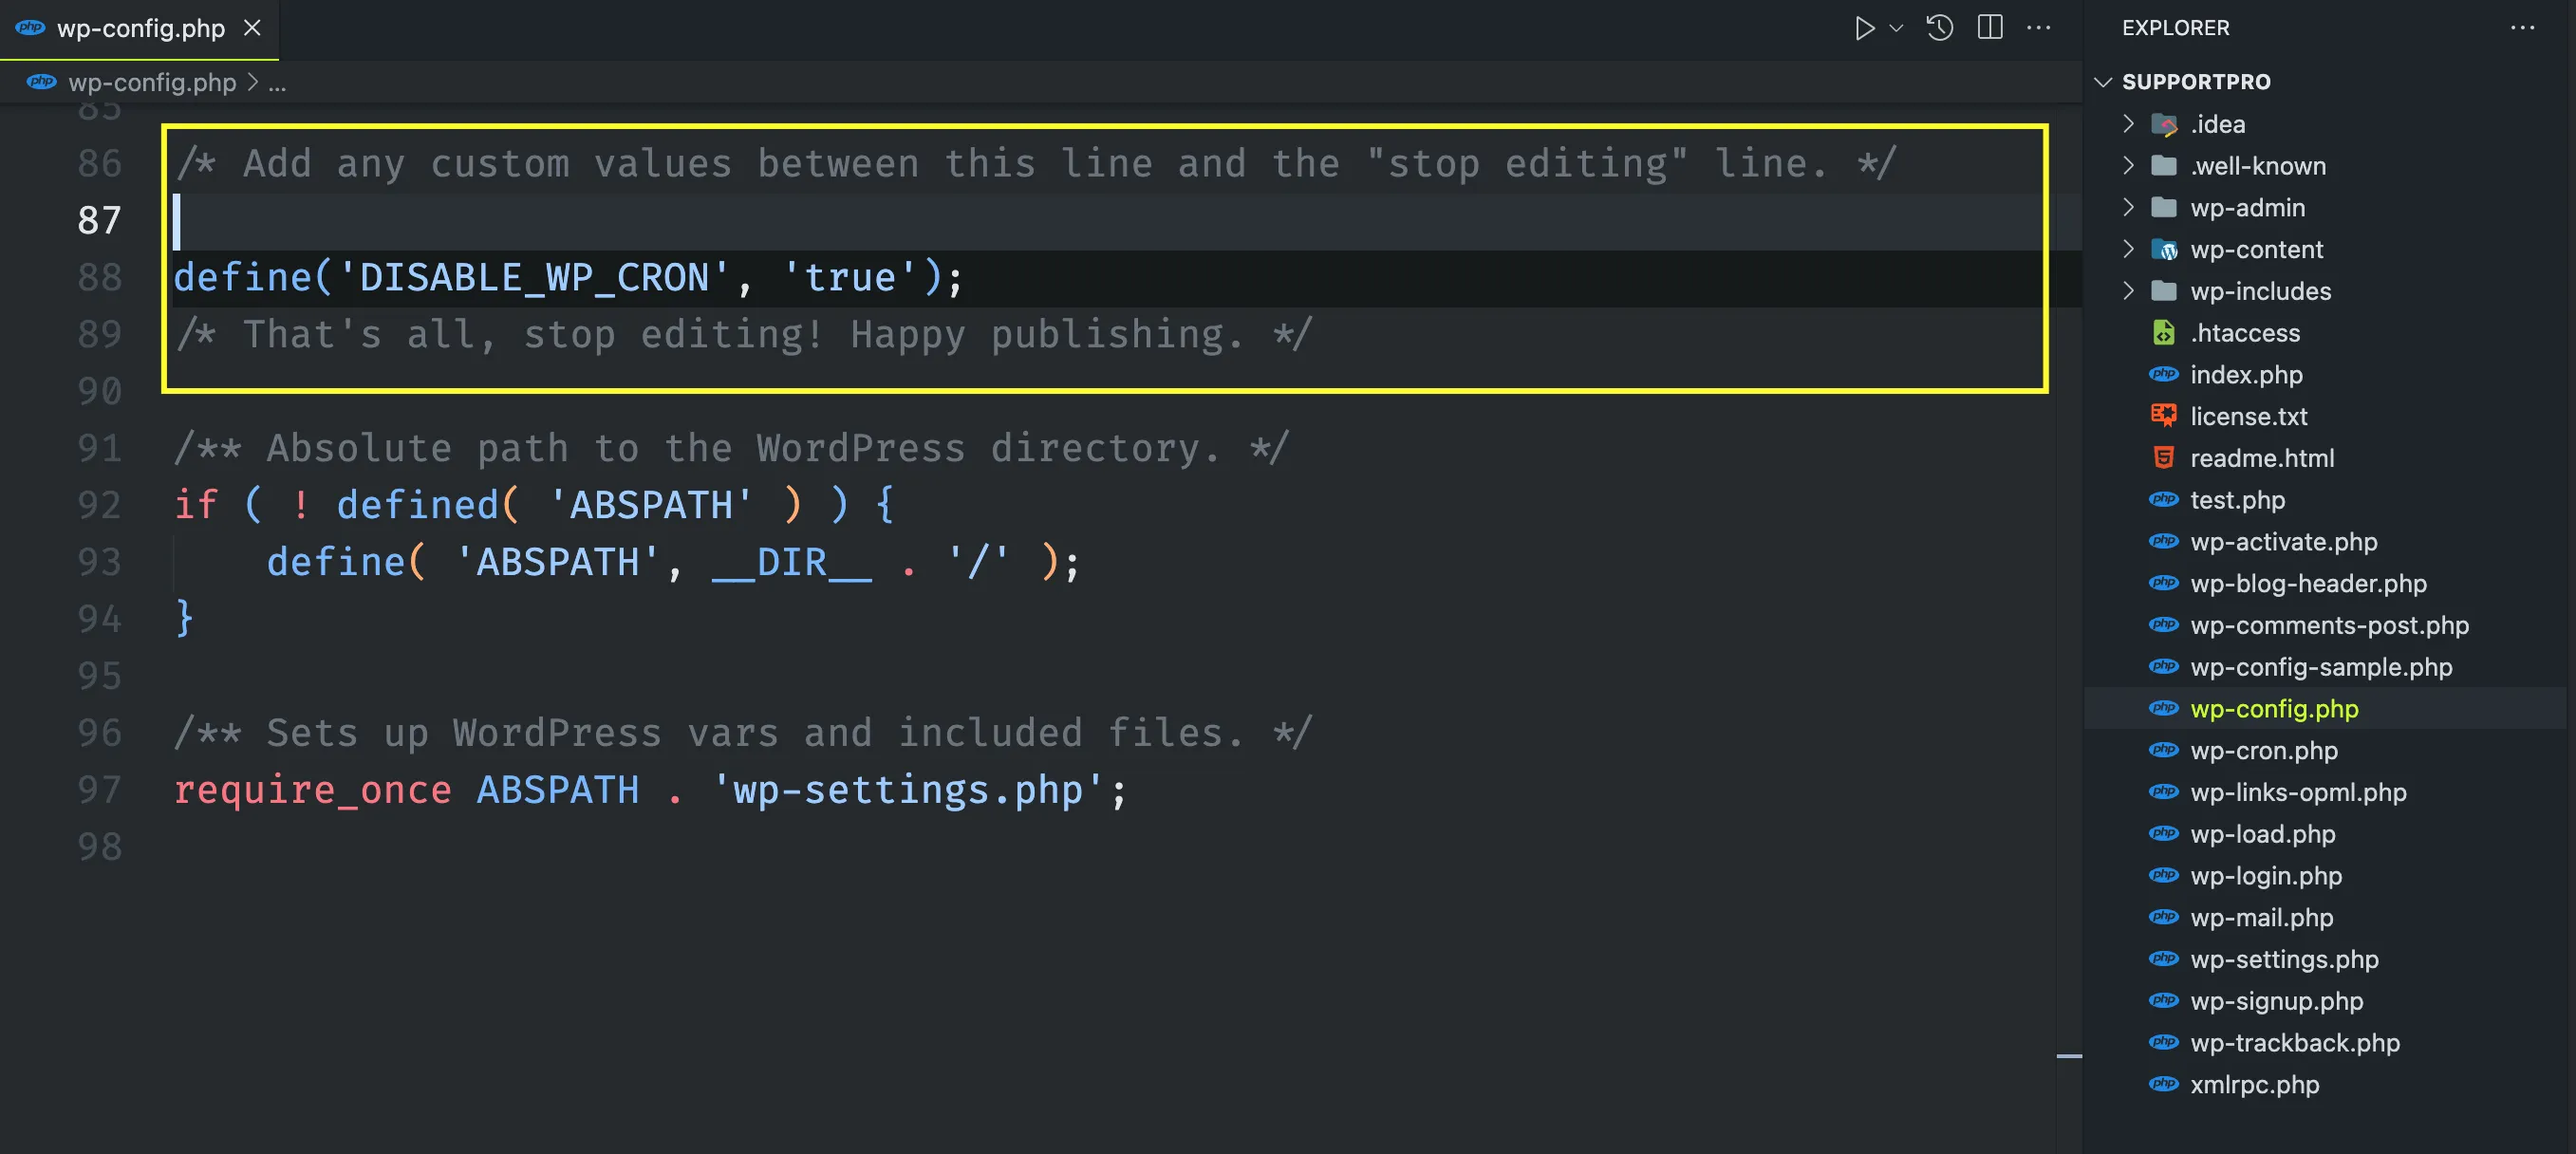
This will disable or tell WordPress not to run the scheduled events from PHP anymore.
Identifying Cron Command
Before setting up a server-side cron job for WordPress, it’s important to identify the correct paths for your website’s directory, the WordPress cron file, and the PHP binary. This ensures your scheduled tasks run smoothly and reliably. Let’s walk through how to gather this essential information.
Now we need to find the website directory and the WordPress Cron file so that we can put that in the Cron Settings.
Check Home Directory
When you log in to the cPanel dashboard, look at the right sidebar under the “General Information” section. Here, you will find details about your account, including the “Home Directory.” This directory is the root folder for your cPanel user, and all your website files are stored under this path.
For example, if your cPanel username is regiktux, the home directory will typically be something like:
/home/regiktux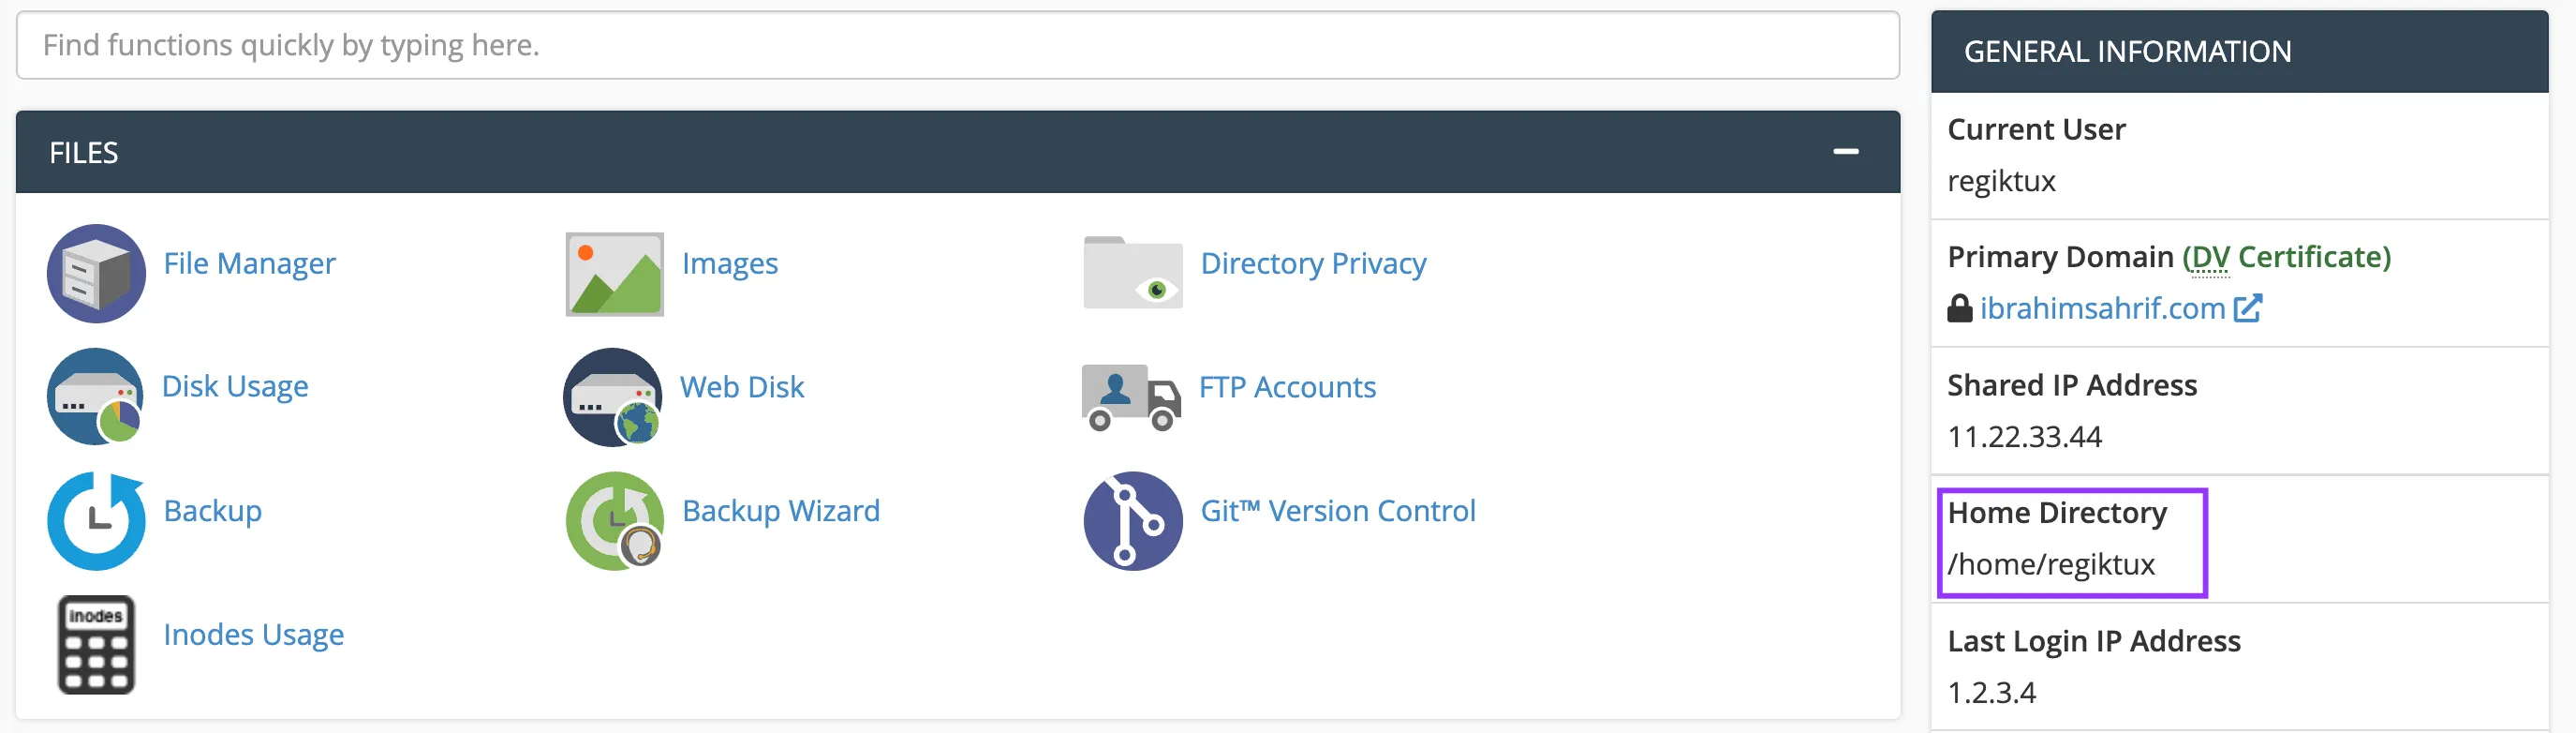
Check Document Directory
Now we will check the Document Directory for the WordPress website. It can be found from the Domains option:
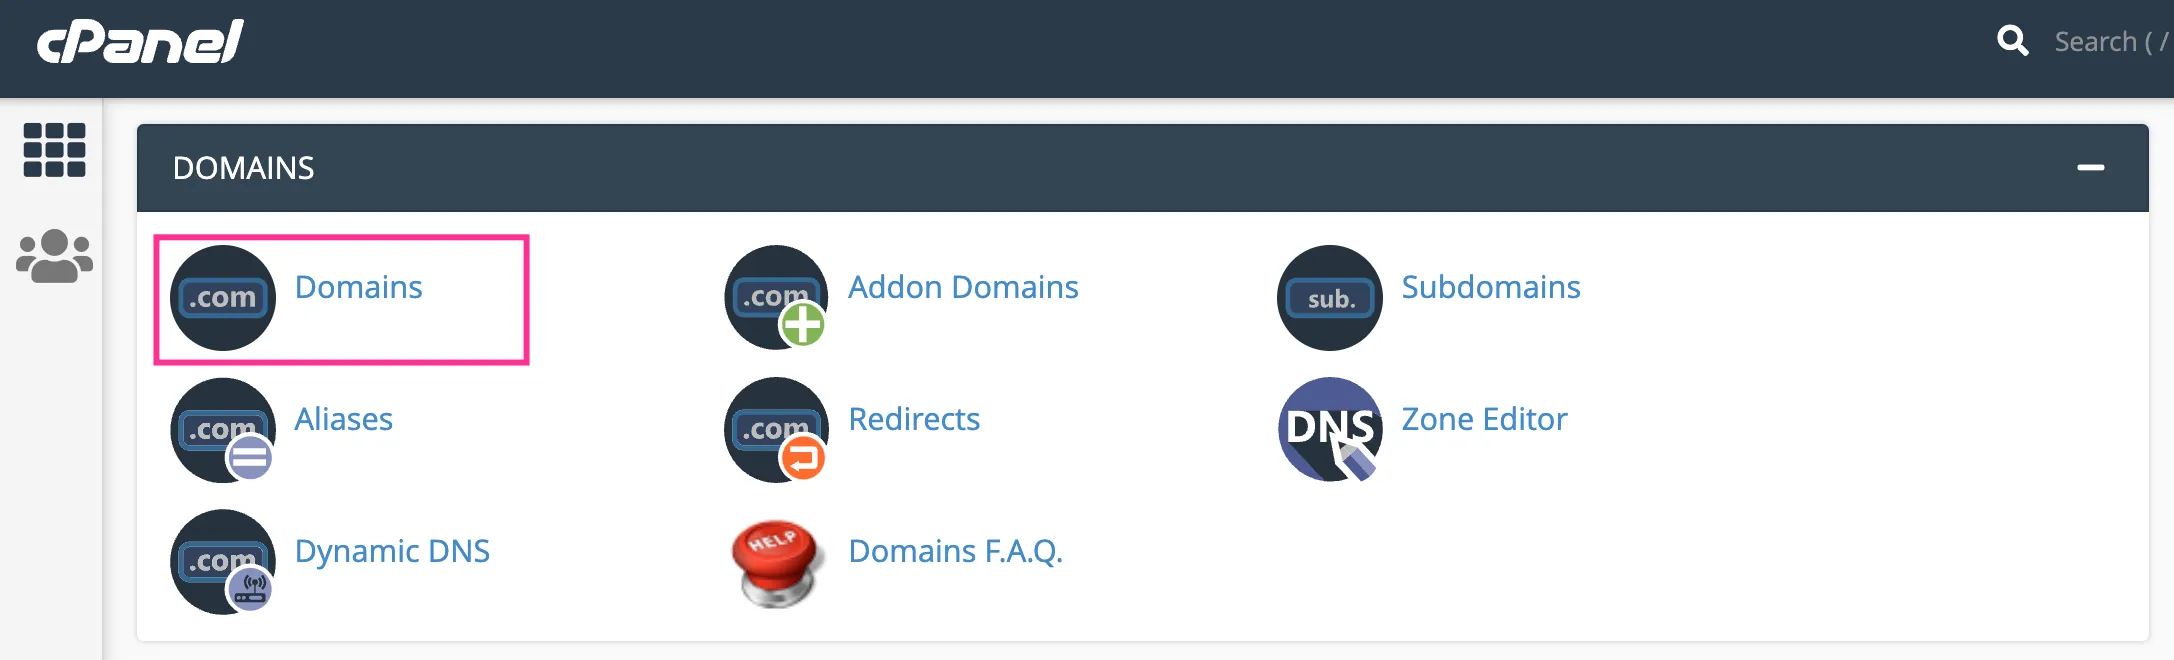
Now we need to look for the Domain of the WordPress website and you will see the Document Directory where a Home Icon will represent the Home Directory as we have collected in the previous step. In this case, the Document Directory is 🏠/ibrahimsharif.com

So our total path for the domain is:
/home/regiktux/ibrahimsharif.comAnd the WordPress Cron path is:
/home/regiktux/ibrahimsharif.com/wp-cron.phpFinding PHP Binary Path
Now we need to find the PHP Binary Executable Path, which is necessary for setting up the cron job correctly. The PHP binary is the program that executes PHP scripts on your server. Depending on your hosting environment, there may be multiple PHP versions installed, so it’s important to use the correct path.
To determine the PHP binary path, you can use the Terminal or SSH Shell provided by your hosting provider. If you have access to cPanel, you can use the Terminal feature, or you can connect via SSH if that’s enabled for your account.
Please run the following command in the terminal to locate all available PHP binaries on your server:
whereis phpThis will show results like below and as you can see /usr/bin/php and /usr/local/bin/php both are available here and are the most common path for PHP Binary Executable.

Confirming PHP Version
If you find both of them then both of their versions may be different and we need to confirm the PHP version by executing the below command:
/usr/bin/php -vThis command shows the PHP version for that exact PHP binary and here you can see it is 7.4.33

Cron Settings
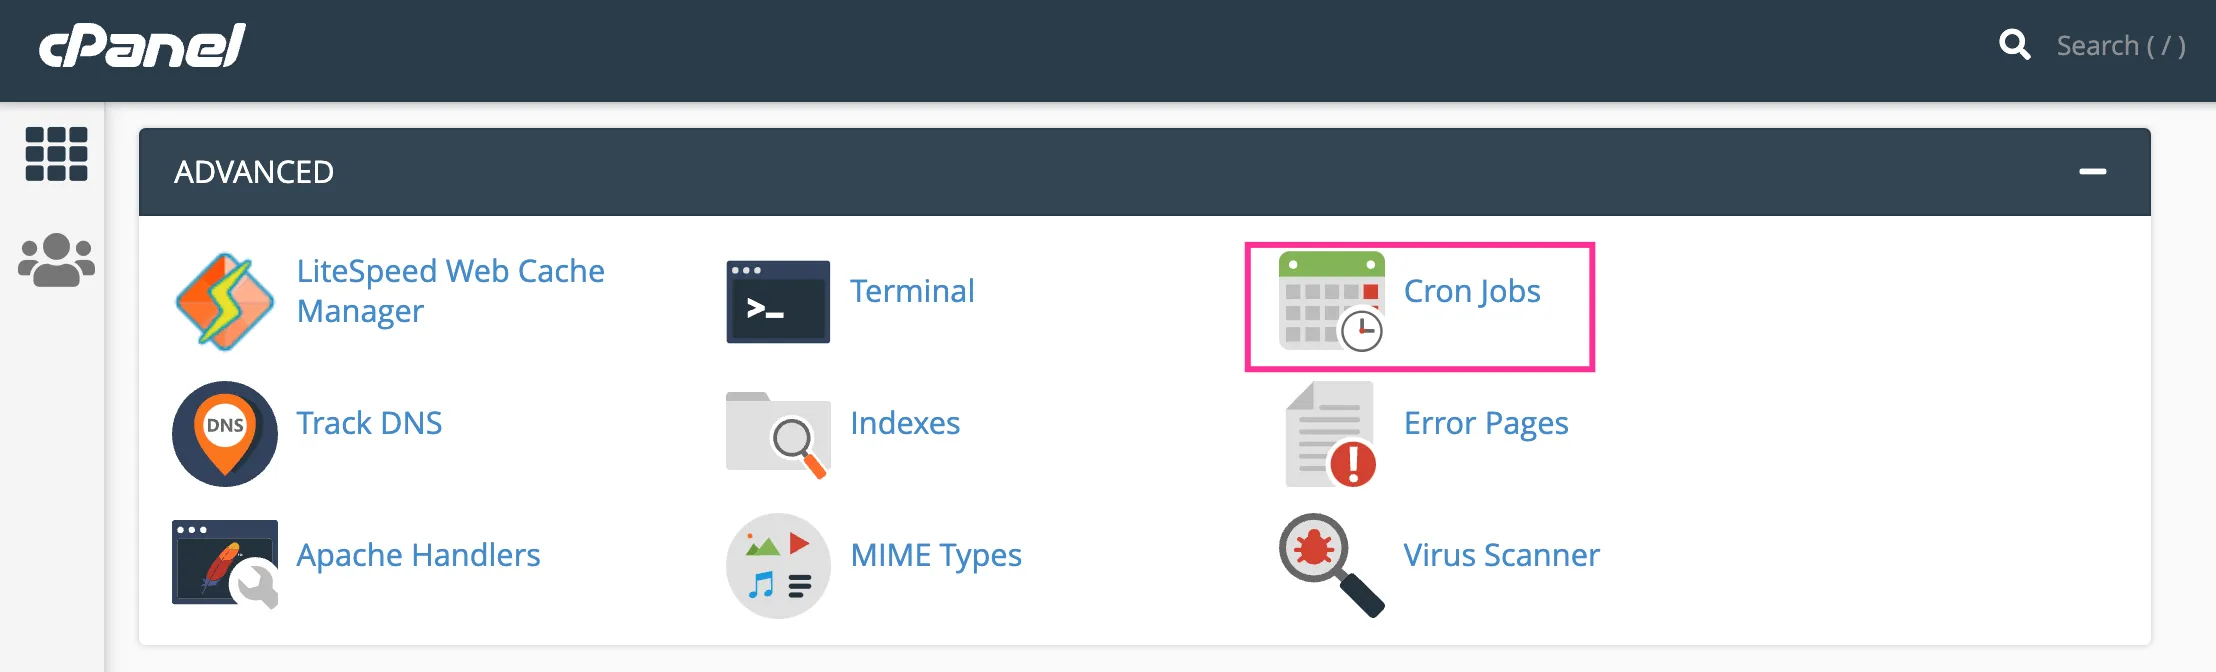
Now please go to the Cron Jobs option in your cPanel dashboard. You can usually find this under the “Advanced” section or by searching for “Cron Jobs” in the cPanel search bar. Clicking on this option will open the Cron Jobs management page, where you can create, edit, or remove scheduled tasks for your hosting account.
On the Cron Jobs page, you will see sections for adding a new cron job, viewing current cron jobs, and setting up email notifications for cron outputs. Locate the “Add New Cron Job” section to proceed with configuring your WordPress cron command.
This will offer some input fields to set the Cron Intervals and the Cron Command as below:
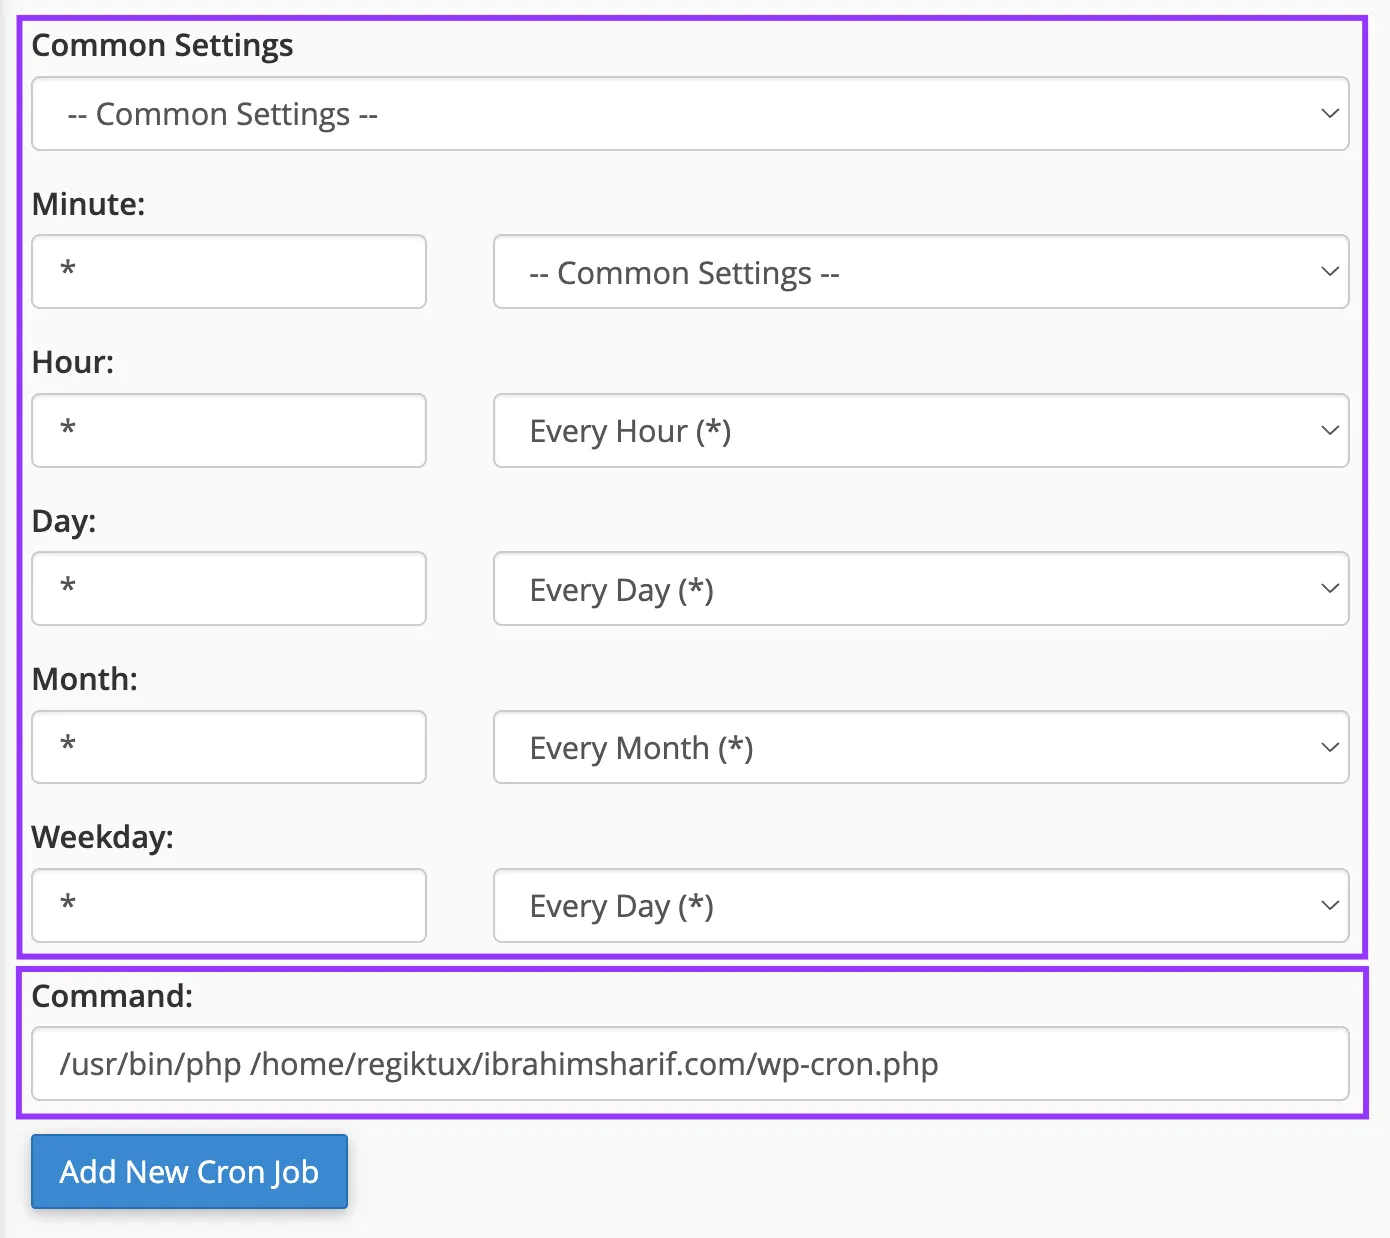
Cron Time Intervals
When setting up a Cron job for WordPress, it’s common to schedule the task to run every minute. This ensures WordPress scheduled tasks (like publishing posts or sending emails) are triggered promptly.
A typical Cron schedule uses five fields:
- Minute (0-59)
- Hour (0-23)
- Day of Month (1-31)
- Month (1-12)
- Day of Week (0-7, where 0 and 7 are Sunday)
Using asterisks (*) in all fields (* * * * *) means the job runs every minute. Most of the case, the suitable recommended time interval for running the Cron job is per minute. Putting a Star(*) means EVERY. Here all 5 stars mean Every Minute on Every Hour on Every Day on Every Month on Every Weekday.
Cron Command
Now we need to put the Cron Command which is the PHP Binary and the WordPress Cron file. The command for running WordPress Cron Script including the PHP Binary is:
/usr/bin/php /home/regiktux/ibrahimsharif.com/wp-cron.phpAnd the total command including time intervals which is the resulting final output is:
* * * * * /usr/bin/php /home/regiktux/ibrahimsharif.com/wp-cron.phpConfirm Cron Command
To ensure your cron job is set up correctly, it’s important to manually test the command before relying on automated scheduling. You can do this by running the cron command directly in your terminal or SSH shell. This helps verify that the PHP binary path, the WordPress cron file path, and file permissions are all correct.
For example, run the following command in your terminal:
/usr/bin/php /home/regiktux/ibrahimsharif.com/wp-cron.phpResolve Cron Command 500 Error
The command we used in this case executed shows an error of 500 which is server side as below:

A successful command should output a Response Status of 200, indicating that the wp-cron.php script executed without any server-side errors. If you encounter a 500 Internal Server Error, it typically means there is a problem with the server configuration, file permissions, or the PHP environment.
One of the most common causes for this error is incorrect file permissions on the wp-cron.php file. By default, the file should be readable and executable by the server. Setting the file permission to 755 (read, write, and execute for the owner, and read and execute for group and others) usually resolves this issue. You can change the file permission using your cPanel File Manager or by running the following command in your terminal:
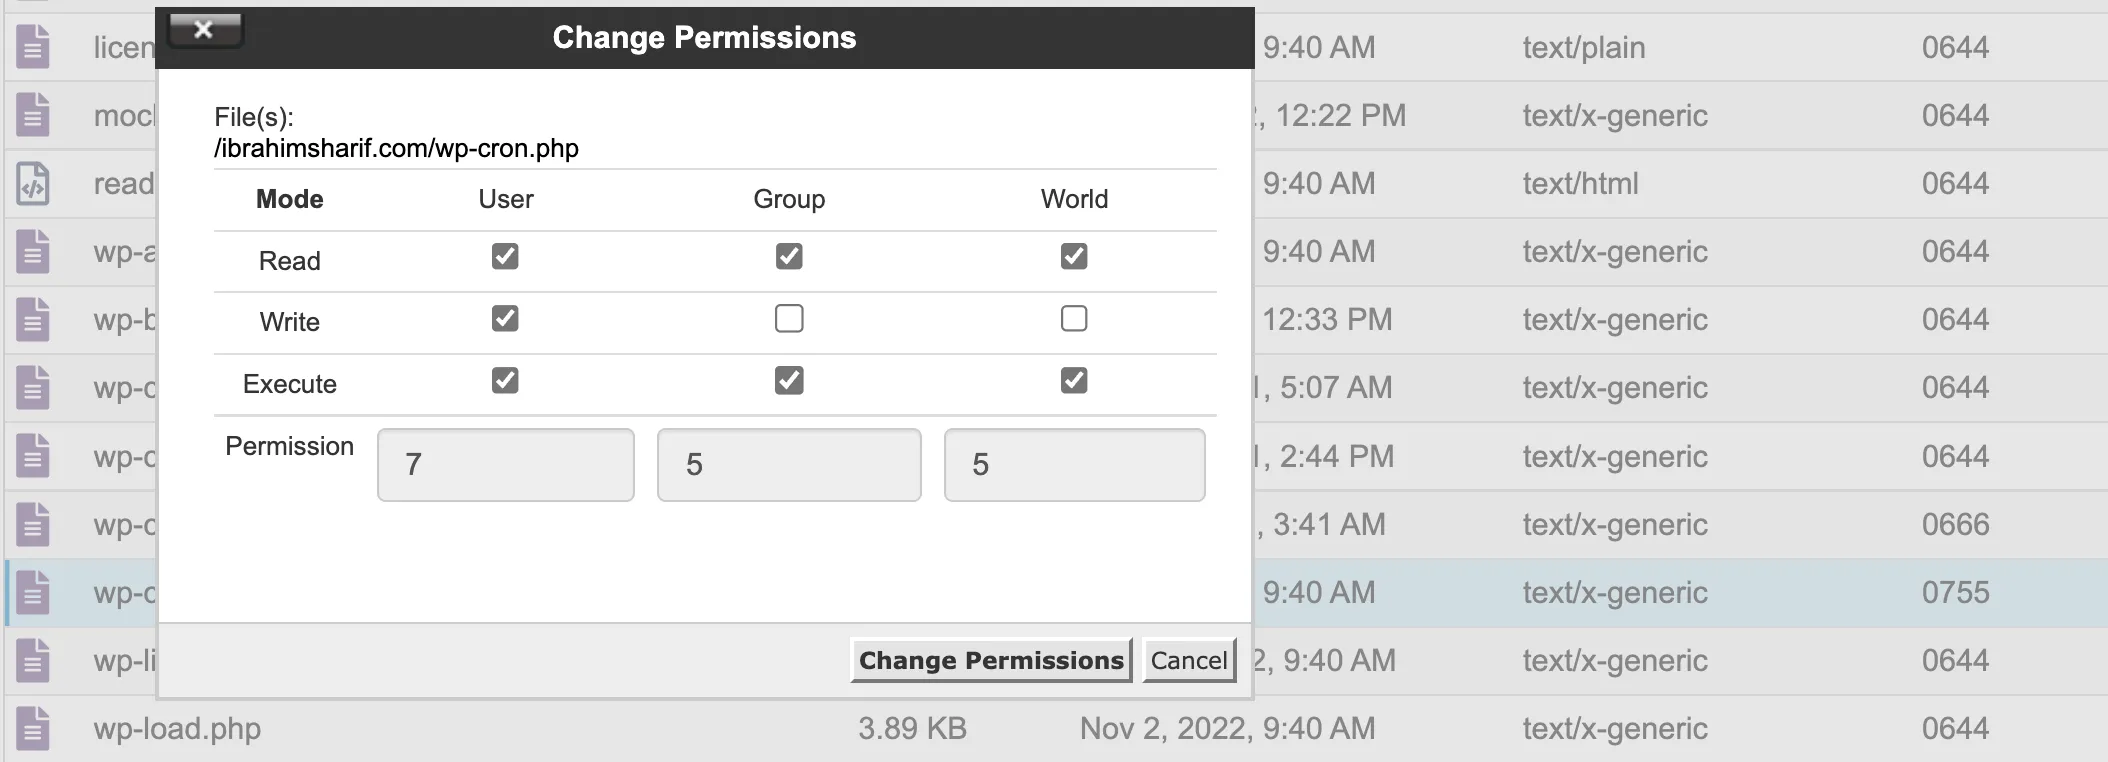
After changing the file permission to 755 running again the cron command runs successfully and shows the successful response status as below:

Discarding Cron Command Output
After running the command it showed us an output that we do not need or should discard through running the Cron Job. Our original command is:
/usr/bin/php /home/regiktux/ibrahimsharif.com/wp-cron.phpBy default, when a cron job runs, any output (including errors) generated by the command is sent to your account’s email address configured in cPanel. Over time, this can clutter your inbox with unnecessary messages, especially if the cron job runs frequently and does not produce meaningful output.
To prevent this, you can redirect both the standard output and standard error streams to /dev/null, which effectively discards all output. This is done by appending > /dev/null 2>&1 to the end of your cron command. Here’s what each part means:
>redirects standard output (stdout) to the specified location (/dev/nullin this case, which is a special file that discards all data written to it).2>&1redirects standard error (stderr, file descriptor 2) to the same location as standard output (file descriptor 1).
So, the final cron command to run WordPress scheduled tasks silently, without sending any output or error messages, is:
* * * * * /usr/bin/php /home/regiktux/ibrahimsharif.com/wp-cron.php > /dev/null 2>&1This does not output anything but does the job silently as shown below:

Wrapping Up
By following the steps above, you have successfully configured a server-side cron job for your WordPress website using cPanel. This approach ensures that scheduled tasks in WordPress (such as publishing scheduled posts, sending emails, or running plugin maintenance routines) are executed reliably, regardless of site traffic or user activity.
Key takeaways:
- Disabling the default PHP-based cron in WordPress prevents missed or delayed scheduled events.
- Identifying the correct paths for your PHP binary and WordPress installation is crucial for a working cron job.
- Testing your cron command manually helps catch permission or configuration issues early.
- Redirecting output to
/dev/nullkeeps your inbox clean from unnecessary cron emails.
With this setup, your WordPress scheduled events will run smoothly and efficiently. If you ever need to adjust the frequency or troubleshoot issues, you can revisit the Cron Jobs section in cPanel or check your server logs for more details.
Happy automating your WordPress site!